Monday, December 19, 2011

Using Herbs: Smudge Sticks and Burning Bundles


A couple of months ago I took deep and final cuttings and harvested the balance of my herbs from the herb garden. Some of these bundles were brambled and jarred up for culinary, ceremonial and medicinal purposes. However the bulk of that final cutting were dried and prepared to make burning bundles and smudge sticks. These will be part of my holiday gift baskets to share more bounty from the garden with my family and friends.


For the smudge sticks I chose sage, rosemary and lavender. These three herbs are traditional for spiritual cleansing and protection and make great choices. I like to combine herbs rather than simply use sage (my olfactory preference).


Choose the twine you will use to wrap the smudge stick. Use a natural material like cotton, raffia or hemp, and when possible select a red colored twine. Red is the most common color used in Native American ceremonies for its spiritual power.


Lie out your cuttings and form an easy to wrap bundle. Place the herbs that burn fast on the inside of the stick and place the sage on the outside. Tie a loop on one end of the twine and pass the other end through the loop to make a slipknot. Pick up the herb pile and place the slipknot loop around the bottom of the stems, pulling tight.


Wrap the twine around the smudge stick until you have reached the top. Be sure to keep a moderate tension. If the twine is too tight the smudge stick will not burn well, however if it is too loose your smudge stick will fall apart. When you have reached the top, reverse the direction, wrap again to the bottom, and tie a knot. These smudge sticks are used to cleanse a space of negative energy.


Burning bundles are used in fire places and fire pits to add fragrance and a touch of magic to the hearth fire. I chose to make two types; a lemon/lime bundle and a winter herb bundle.
The lemon-lime bundle consists of three pieces of fat wood, a small bundle of hosta stems (lunar magic), lemon balm (success) tied up with dried lemon and lime slices (success and protection).
The winter herb bundle contains fatwood, cinnamon (love), rosemary (protection) and lavender (love and enchantment). These bundles are tied up with dried orange slices.


There are so many ways to use herbs, I hope you like these!


Happy Gardening!

Sunday, December 4, 2011

A Bistro Favorite to Chase away the Cold


Two of my dear friends Aubrey and Suzanne recently took their honeymoon in London and Paris. I know they had a lovely time in the City of Lights. I recall the life changing trip to Paris I took many years ago. I can recall the sights, smells and tastes of that fantastic city at any moment. One of my favorite things to do was to sit and eat in cafes and bistros, these are the places where life happens in Paris. Salads, Croque Madame’s , Monsoirs, soups, steaks, roast chicken all take on a Parisian flair when served on gleaming white plates by hurried waiters.

One of my favorite dishes back then and still today is French Onion Soup or Soupe a l'Oignon au Fromage. It is an easy dish to make and the rewards are spectactular. This soup, when made properly serves as a fantastic lunch course with a salad or a hearty first course at dinner. This recipe serves 6 people. This morning was chilly and frosty so I decided to let the yard warm up a bit before I attempted any yard work so I put the time to good use in the kitchen. I pulled some onions that came from the garden out of the pantry and made a big batch of soup!

6 large onions (about 5 pounds), sliced thin
1/2 stick (1/4 cup) unsalted butter
1tablespoon all-purpose flour
1 1/2 quarts beef broth
twelve 1/2-inch-thick slices of French bread, toasted
3/4 pound coarsely grated Gruyère

In a large kettle cook the onions in the butter over moderate heat, stirring frequently, for 40 minutes, or until they are golden brown. Sprinkle the onions with the flour and cook the mixture, stirring, for 3 minutes. Add the broth slowly, stir the soup constantly until it comes to a boil, and simmer it, covered, for 20 minutes. Season the soup with salt and pepper. Put 2 slices of the toast in each of 6 heated soup bowls, top each toast with 1 tablespoon of the Gruyère, and pour the soup over the toasts. (To serve the onion soup gratiné, arrange the 12 toasts on the bottom of a flameproof casserole, heap each of them with 1 tablespoon of the Gruyère and boil it under a preheated broiler about 4 inches from the heat for 3 minutes, or until the cheese is melted and bubbling.)

This soup freezes beautifully so don't worry if you don't have six hungry mouths to feed with it, make up a batch, have some for lunch and freeze the rest!

Happy Gardening!

Saturday, December 3, 2011

Celebrating The Holidays and Bringing the Outdoors In!

The wheel of the year has turned us to the time of the Winter Solstice, Yule and of course Hanukkah. All of these traditions celebrate the return of light in one way or another. The darkest day of the Solstice marks the time when the days will grow in length. Yule is a winter festival that was initially celebrated by the historical Germanic people as a pagan religious festival. Large “Yule logs” were burned for many days to chase away the cold and dark nights. Hanukkah of course celebrates a victory for my ancestral people over their oppressors and a miracle involving holy oil and light in the temple.

This year, like in years past I celebrate these holidays. This year, however, I decided to incorporate them all in my holiday decorating. Sadly, last year my exquisite Lennox Menorah was destroyed and I have not been able to replace it as of yet, so I decided to use votive cups and tea lights as a menorah this year. This allowed me to incorporate some of the season’s plants in my home.

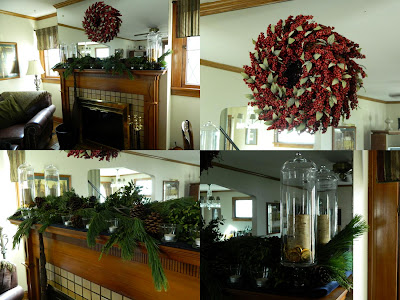
I laid out the special blue velvet mantle cover I use each year, then laid out boughs of Pine, Cedar and Boxwood. Herb and plant lore tell us that Cedar will remove negativity from a space; Pine is a spiritual cleanser and that Boxwood energy is used for protection and granting wishes. I also included a dried Bayberry wreath on my mantle for prosperity, health, healing, protection and luck!

I finished the whole thing off with birch candles in large apothecary jars surrounded by golden Hanukkah “gelt” . The word gelt means money in Yiddish and refers to money as well as chocolate coins given to Jewish children on the festival of Hanukkah.

Incorporating these themes into my home helps me feel I am honoring all of my traditions. I hope you all have a peaceful and happy holiday season!

Happy Gardening!

Monday, November 28, 2011

Humbled (Part 2)


My visit to the Grand Canyon was not only a spiritual experience, it was also remarkably educational. I am a nerd frankly and I am not ashamed to admit it. I like understanding the ecosystems of the places I visit, learn about the indigenous people, its history as well as the plant and wildlife.

The Grand Canyon is a steep-sided canyon carved by the Colorado River. The Canyon is located in the state of Arizona. Most of the Canyon is contained within the Grand Canyon National Park (established 1919). It is considered a Wonder of the Natural World.

The Grand Canyon is 277 miles long, up to 18 miles wide and attains a depth of over a mile. This is one of the reasons photos just can’t do the canyon justice, even standing at its rim, the human eye has trouble grasping the distance and depth.

Nearly two billion years of the Earth's geological history have been exposed as the Colorado River and its tributaries cut their channels through layer after layer of rock while the Colorado Plateau was uplifted. While scientists debate the timing of the activity, most recent evidence suggests the Colorado River established its course through the canyon at least 17 million years ago

For thousands of years, the area has been continuously inhabited by Native Americans who built settlements within the canyon and its many caves. The Pueblo people considered the Grand Canyon ("Ongtupqa" in Hopi language) a holy site and made pilgrimages to it (I totally understand why!). Some of the earliest European’s to view the canyon were Spaniards who were guided by the Hopi to the south rim. One of the most documented and a famous expedition was John Wesley Powell in 1869. Once the railroad was established in 1901, tourism really boosted the area to prominence with one of the buildings on the rim being a Harvey restaurant and hotel. Its history and that of the “Harvey Girls” is illustrated on the site and in my pictures…a little shout out to one of my favorite Judy Garland movies (1946).

The extreme changes in elevation from canyon floor to rim support a wide range of plant and animal species. The lower canyon has a lot of desert areas as well as marsh areas near the river itself. The rim has ponderosa pine forests, Aspen trees, Juniper groves as well as Montane forests. The unique animal inhabitants of the canyon area include the Humpback Chub fish, Big Horn Sheep, Canyon Rattlesnakes, The Pinyon Jay, Mountain Lions, Wild Turkeys, Mule Deer and Two distinct species of Squirrels that were once a single species (North Rim: Kaibab and South Rim Abert) that adapted to the different climates of the diametrically opposed rims.


I know hundreds of thousands of people have toured the canyon before I did, but it was still breathtaking. If you ever get the opportunity to do it, DO IT!!!


Happy Gardening!

Humbled (Part 1)


I have been waking from a dream for quite some time….each new experience lifts the veil and the clouds over my mind and spirit a little more. I have always been a lover of nature and hopefully a good steward of the planet we live on, but I have been a victim, like many, of the feeling of separation and dominance over nature.

Over the last few years, that feeling has been abating…by immersing myself in nature by gardening, being out in nature and feeling the interconnectedness of everything is, by making this connection a spiritual pursuit. Each of these experiences enriches my mind and nourishes my soul.

My most recent experience was on a trip out west. I had the opportunity to visit and tour the Grand Canyon for the first time in my life. To say that it was a humbling and awe inspiring visit is an understatement. At first the cloud bank obscured most of the canyon and I thought the 5 hour ride was going to be a bust, but the clouds cleared and I caught glimpse of the canyon for the first time. I was literally moved to tears. The clouds continued to clear and the view became more and more spectacular. I felt the power of nature by seeing how it can carve and create the landscape. The spirit of the land in this area is ancient and very, very present.

The pictures I took simply cannot do this wonder justice. In this post, I have included a panorama shot I created, but in my next I will create a composite image for you to enjoy.

While the garden is resting and recuperating in my own back yard, I am committed to stay out in nature and bring those experiences back to you!

Happy Gardening!

Saturday, November 5, 2011

You Say Cacciatore, I say CacciatorA!!!!


Americans may know this dish as cacciatore (hunter’s style), but it’s really cacciatora, named in the honor of the hunter’s wife – who, in parts of northern Italy, traditionally cooked it on the eve of the hunt as fuel for the chase.


You could also call this dish "Ken had a crazy September Schedule and couldn't can his tomatoes so he came up with this instead". The fact is that my September was insane...and August was no picnic either. Work was a bear, I started a graduate school program and I decided to take an 11 year overdue vacation! But the garden waits for no man, not even me; so I decided to freeze my tomatoes whole to be able to make sauce later. The freezing process is easy...don't peel the tomatoes, just wash and core, pop them into freezer bags and get them into the freezer quickly! I happen to be fortunate and have a chest freezer...very conveinent!


Once you have a break and can do something with your tomatoes, just bring the freezer bags out and thaw either in the sink or in the refrigerator until they are completely thawed. I popped mine right into the slow cooker and put them on high for one hour. While I waited, I 1 large onion and a head of garlic (minced) in a separate pan. Once the onions and garlic are soft and completely cooked, I set them aside. After one hour, I pass the tomatoes through a food mill to separate the skin and seeds from the valuable juice and pulp of the tomatoes. The food mill attachment makes a nicer texture than ricing the tomatoes or using a food processor, plus the mill really does a nice job collecting the peels for the compost heap.


Return the sauce to the slow cooker, add the onions and garlic and allow to cook (covered for part of the time and uncovered for part of the time) for 6-8 hours.


While the sauce is cooking, sterilize and prepare your jars. Once ready, fill the jars allowing 1/2 inch head space, add 1/2 teaspoon lemon juice to the jars and pressure can (you cannot water bath can this sauce due to the extra ingredients). Quarts and pints are to be processed at 11lbs pressure for 15 minutes. Once passed, shut the heat off and allow the canner to depressurize before removing the lid, extract the jars and cover with a towl and allow to cool...the seals will pop as the product cools. Store in a cool dark place until ready to make your dish.


Chicken Cacciatora


1/4 cup extra virgin olive oil
1 3 pound chicken, cut into 8 pieces
1 cup dry white wine
1 quarts of canned Cacciatora sauce


1/4 cup minced fresh Italian flat leaf parsley
Kosher or sea salt and freshly ground black pepper
1 cup rich chicken stock (see note below)


In a cast iron or enameled cast iron pot, add the olive oil, then add the chicken and fry, turning the pieces several times to brown evenly, about 4 minutes per side.

Add the wine and cook until it evaporates, about 6 minutes. Add the prepared sauce and parsley, reserving 1 tablespoon or so for garnish. Season to taste with salt and pepper. Reduce the heat to low, partially cover, and simmer, add the chicken stock gradually as the tomato juice evaporates, for 45 minutes. Remove the bay leaf and garnish with the reserved parsley. Serve with steamed potatoes or white rice.

Note: If you have to use canned chicken broth, supplement it with a little chicken stock base paste or a bouillon cube.

Happy Gardening!

Sunday, October 30, 2011

Halloween Candle Making!


Halloween or Samhain is a traditional time to make candles since it marks the start of the pagan new year and also a time when (at least the Northern Hemisphere) enters a time of darkness.


Since the day was sooo cold, I decided to stay in all day. Aside from a little housework and the completion of the apple butter, I decided to make candles to commemorate the holiday. These candles will be gifts for the later winter holidays.


I made Lemon Verbena and Sage Candles with essential oil of Lemon and Sage. These are perfect candles to be burned in the kitchen since the are in jars and the scents are complimentary, but they can be burned anywhere in the house (following safe practices of course). I added powdered herbs that I dried from the garden. Herb lore tells us Lemon Verbena has the energy for purification and love. Lemon brings longevity, purification, love and friendship, while Sage's energy is for immortality, longevity, wisdom, protection and inspiration. I can't think of a better gift to give to my friends and family than these energies!


I added the herbs to the brick of pure beeswax being melted in a double boiler. I also added some natural green pigment for color. Once the wax was melted I added the essential oils and blended. I placed the waxed wicks in the jars I selected (these are fantastic Italian canning jars!) and used only soy wicks. I anchored the wicks with a little melted wax and poured the candles in sections to avoid the wicks slipping. I supported the wicks with some handy chopsticks.


Once the candles cool completely, you will probably find a depression near the wick, simply melt a little more wax, add color and fill in...trim the wick once the candle cools and close up the candle. Package as you like and keep for yourself or give as a gift. I hope these gifts will bring my friends and family comfort and light!


Happy Gardening!

Frosty Morning


One of the things that drove me into the kitchen today was the frosty cold morning! I thought about getting up early and heading out to the garden for some work, but the fact that we had our first heavy killing frost last night/this morning prevented me from working out there so early...but I did sneak out in my jammies and wellies to grab a few shots of the frozen, frosty beauty.


Happy Gardening!

Mmmmmmm Apple Butter


Not a long post, just pulled the apple butter out of the canner...I cannot wait to dig into one of these!


Happy Gardening!

Sunday, October 23, 2011

The Marvelous Apple


I love apples, I hope that the trees I planted a couple of years ago are prolific and provide my home with bunches of delicious Lodi and Winesap apples....but until then I content myself with going to Lynd's Fruit Farm (http://www.lyndfruitfarm.com/ ).


Established in 1919 and currently in the 7th generation, Lynd's is 160 acres of beautiful orchards, brambles pumpkin an gourd fields right here in central Ohio. They are marvelous!


I headed out early yesterday morning for my annual picking, I picked about 30 pounds of winesap and 30 pounds of goldrush apples (1 bushel total) and brought it home alongside some spectacular pumpkins and squash for decorating and eating!


Some apples end up in the root cellar for later eating, some will end up being apple chips. The bulk have been split up to make both applesauce as well as apple butter.


Since I make everything in large batches, the recipe is as follows...just cut it down for smaller batches


15 pounds of apples (a mix of sweet and tart apples) cored, peeled (roughly) and sliced...I love my apple peeler, it makes quick work of a lot of apples

2 cups freshly squeezed orange juice

the juice of one lemon and zest of one lemon

2-3 cups sugar

1/2 cup honey

Cinnamon & Nutmeg to taste


Cook the ingredients for 20-3 minutes on medium heat to soften the apples. Turn off the heat and allow to steam covered for an additional 10 minutes. Pass the apples through a foodmill to remove stems or core bits.


Serve immediately or refrigerate for up to two weeks. Freeze or can for longer storage!


Happy Gardening!

Thursday, October 20, 2011

GORGEOUS!


I made a visit to my favorite Columbus treasure, the Franklin Park Conservatory and Botanical Gardens last week. One reason for my visit was to view the exhibition “Hungry Planet” a photo exhibition on global diets….more on that later. The other reason was to get a chance to wander through an outdoor fantasy garden of blown glass pumpkins, gourds, fruits and vegetables created by Michael Cohn and Molly Stone of Cohn-Stone Studios. These pieces were so finely crafted and detailed, I was definitely in awe….I may have to save my pennies (and a lot of them) and purchase a small item from their collection…they are pricey, but stunning!

Michael Cohn and Molly Stone have been making glass art pieces at their studio in Richmond, California, since 1980. Many of their pieces are inspired by nature and the horticultural world. Molly is an avid gardener as well as a glass designer/ blower and has created an art garden showroom as a part of the glass blowing studio. Their work has been exhibited throughout the United States, Canada, Europe, Scandinavia, Japan and South America; it is included in numerous museum, corporate, private art and botanical garden collections and has been featured in a variety of garden venues. http://www.cohnstone.com/

Click on the image above for a better look at the pictures I took and visit http://www.fpconservatory.org/ for more information or to plan your visit!


Happy Gardening!

Saturday, October 15, 2011

Two Year Tree Update


Just about this time two years ago, my dwarf apple trees arrived from the National Arbor Day Foundation. These trees were tiny twigs with a few roots at the bottom of them. I selected two varieties of apple tree (Lodi and Winesap), these are delicious varieties and they cross pollinate well. While the trees are not ready to bear fruit, they are nearly ready to begin training on the trellises. I will begin to coax them along the lines of the trellis system in the spring, but I wanted to show you an update of their progress so far!


The trees are healthy, bushy and spouting side branches. They have also grown about a foot taller than the tiny sapplings I put in the ground two years ago. I am excited to a have the trees and more excited at the possibilities of the fruit they will eventually bear.


Happy Gardening!

Sunday, October 9, 2011

Greenhouse Update


A few weeks back I put the new greenhouse kit on half of one of my raised beds. This kit, from http://www.framitall.com/ provides a 4' X 4' covered space to extend the growing season. With the cool late September, I thought for sure we would be getting frost near the first of October...well it is the second week in October now and the weather has turned to "Indian Summer" with highs in the upper 70's. Harldly a need for a greenhouse I thought.


However, as the picture above illustrates, the greenhouse raised the temperature enough to simulate summer conditions inside and really enhanced the growth of the vegetables inside. The first picture is the califlour, brussel sprouts and lettuce I planted outside the greenhouse. The picture on the right is what is inside the greenhouse (broccoli, radishes, carrots and lettuce)...there is a dramatic difference!


I am going to harvest the radishes tonight and then put down another crop as well as carrots and see how they reach into the colder months with my new favorite thing!


Happy Gardening!

Tuesday, October 4, 2011

Watch That First Step!


My journey began as I detailed in my last blog entry, but once I got on my way, I was not disappointed. The beauty that awaited me was definitely what I needed to be inspired!
Cantwell Cliffs is located in the northern reaches of Hocking County. Its remote location discourages visitation, but those who travel the extra distance will not be disappointed. It is probably the most picturesque area in Hocking County.


Cantwell Cliffs was named for Josiah Cantwell, a pioneer in the in Hocking Hills State Park area. Various springs and drainage systems here make up the headwaters of the stream known as Buck Run that flows away down the valley. The forces of nature have etched an endless mosaic of crevices and patterns on the towering sandstone portico, the erosion caused by Buck Run accounts for the deep valley, steep cliffs and rock shelter under the cliff. This hiking trail isn't for the faint of heart. There are challenges aplenty, I had to remain alert not only for the beauty I was after, but for my own safety.


The landscape is a reddish-brown sandstone cliff shaped like a giant horseshoe that towers 150 feet over the gorge below. The trail lead me eventually to Lookout Point on the east rim, where I was rewarded with a striking view of the cliff and a rock shelter. Along the trail, I encountered inclines and descents, slump rocks (large boulders) on the valley floor, a recess cave and an especially narrow passage nicknamed "Fat Woman's Squeeze." I even found a fallen but yet still alive Beech tree to recline on and meditate for a few minutes!


Not only are the cliffs and gorges amazing, but the plant and animal life are abundant…this is a place where the spirit of nature is definitely alive and pulsating! The trees, plants, subsoil structure, fungi and lichen are abundant and beautiful. Click on the image above for a larger view of the composite image I have created.


Happy Gardening!

Sunday, October 2, 2011

Misadventures in Inspiration!

I am not sure everyone considers what I do an art, but I for one do. Gardening, cooking, healing, writing, completely non professional photography, these are both my calling and my artistic outlet. I read in a book a while back about artists dates. These are dates with your self, your inner artist, doing things and going places that feed your creativity. For me these can include the Columbus Museum of Art, Frankling Park Conservatory, I have gone to Cleveland, Chicago and many other places to visit and feed my yearning for knowledge, beauty and art. I try to do these little trips once a month.

This morning started with a plan to take myself on an artist date, I wasn't sure what form that would take so I put it out into the universe (and facebook) for suggestions. I ended up planning on going to the Hocking Hills to commune with nature.

I prepared myself with a shower, put on my "adventure" pants (that is what I call my North Face cargo pants), collected my journal, my Petersons field guides and I was off...oh wait, I need my camera...cuz you cannot go on an adventure without it. It was not in my bedroom (and I tore it up looking for it), it wasn't in the work room where it normally is (again with the tearing up). In fact it was nowhere in my house to be found. Where in the world was my camera...perhaps it was in my car...more tearing, no camera...well I must have left it at work...I can swing by on the way out of town, pick up the camera and be off....ummm, nope. I came back home and tore up the house once again...no camera, well I either left it in the garden the last time I took pictures (in which case it would be water logged....and um, no it was not there) or I left it at the coffee shop, library or the thousands of other possibilities....ugh!

I really liked this camera, it was small but powerful, took great pictures with it's 7.1 megapixel goodness, it was easy to upload...we are not happy! I eventually resigned myself that the camera was just gone. After all, it was 6 years old and I had been thinking about a new camera...perhaps my artist date will be shopping for a new camera.

I stopped at 3 places this morning, I looked at some schmancy SLR cameras which candidly I think will just set themselves up on the tripod, take the shots for you...they will probably drive to the destination for you...you can probably just stay home...but they do come with a hefty price tag. I am in no way a professional photographer, I take pictures of my garden and in the woods...sometimes I take pictures of things in my house, I am not sure I need something you take along on Safari when covering it for National Geographic.

After some additional comparison shopping I decided on a pretty schmancy Nikon digital camera, it is the camera just below the SLR class, can has standard settings as well as can be customized for pretty much any kind of picture taking you want. With a fancy memory card, stylish carrying case and batteries I was out of the store and out several hundred dollars. That's the bad news....the good news was it was still early enough to go on my date so I headed down to the Hocking Hills, took a 10 mile hike and took hundreds of pictures....they will be featured in a later blog post. I felt awed by nature and complete inspired!

Oh, and above is a picture of my new camera, case and accessories (and a bit of one of my cat's tail)....taken with my old camera, I found it about 5 minutes after getting home from my adventure...grumble grumble

Happy Gardening!

Saturday, October 1, 2011

When it is cold, I think of summer!


Yeah, I was not expecting a windchill of 37 degrees F on the first of October, but what are you going to do...those who doubt climate change can kind of kiss my patooty...this year's weather has been, in a word, FUNKY!


But I am not one to grumble, I just find things to do, this morning, I cut the last of the rosemary from the garden and am in the process of drying it. This rosemary will be used for making burning bundles later this year. I also harvested the thyme and oregano and they are drying as we speak. I continued my work on my holiday presents.


I celebrate all the winter holidays because I have friends and family that do the same, so my gift list is what you would call eclectic ;-)...but never fear...gifts from the garden never dissapoint no matter what the occasion.


In the past I have made flavored oils and vinegars with small herb bounty from the container herb garden I have kept for years, but with this years addition of an herb garden I was able to grow more and different herbs...and that got me thinking of different products to make.


Instead of oils and vinegars this year, I am going to make syrups! Herb flavored syrups are so versatile you can't believe. Sweet herb syrups can be used to flavor everything from your morning pancakes to your evening cocktail, they add flavor and moistness to cakes and quick breads and they can also be used to treat ailments both directly and indirectly....directly by the attributes of the herbs and sometimes indirectly by acting as a carrier for other less delicious medicines!


Since I had a glut of Lemon Verbena in the garden late in the year, I decided to make Lemon Verbena syrup and include a bottle of soda with my holiday gifts. People can use them together to make a delightful lemonade or they could use the recipe (below) for a sparkling cocktail anytime of the year!


Lemon Verbena Syrup

(Makes about 9 cups)


8 cups sugar

8 cups water

4 cups fresh lemon verbena leaves


Bring water and sugar to a simmer in a saucepan, stirring to disolve sugar. Add lemon verbena leaves. Bring to a very low boil. Then immediately reduce the heat to bring back to a simmer. Simmer for 10 minutes. Remove from heat and allow to cool. Strain the lemon verbena leaves and discard. Decant and either seal with cork and wax (can be stored for several months in a cool dark place) or refrigerate for up to one month.


Pear/Lemon Fizz

(makes one drink)


1/2 ounce pear flavored vodka

3/4 ounce Lemon Verbena Syrup

1/2 ounce fresh lemon juice

Champagne (for floating)

1 fresh (or dried depending on the time of year) lemon verbena leaf for garnish


Fill a cocktail shaker with ice. Add vodka, syrup, and juice. Shake and strain into a cocktail glass, float champagne and add the leaf for garnish!


Happy Gardening!

Monday, September 26, 2011

The Greenhouse Kit! Season extending techniques


I was so excited when my greenhouse kit for the raised beds came a few weeks ago, I hope that it extends my growing season by several weeks if not a couple of months (depending on the severity of our early winter here in Columbus).


The air over the last few weeks has been steadily getting cooler and before we get into a situation where the crops are stunted or worse threatened by frost, I thought it best to put the greenhouse kit on one of the beds.


The kit, provided by http://www.frameitall.com/ fits on the raised beds I purchased from them a couple of years ago. The fabulous thing about this system is that they include extra parts in case you don't have their raised beds. These parts adapt to your bed so you can still use their greenhouse kit. Another advantage of this system is if I want to expand it (and I might after I see how long it extends the season) it is easy simply to add framing pieces and zip together two of the heavy guage plastic domes.


The set up took all of 10 minutes of laying out the parts, reviewing the instructions and setting it up....super easy and it looks great. The greenhouse has flaps and bird netting to allow air flow and venting that can be covered over with the plastic flaps to protect the crops when the air cools down at night!


For ease of construction, I give it a 10, we will see how it works and I will update you!


Happy gardening!

Sunday, September 25, 2011

The Motherload of Herb Harvests!


I knew this day was coming, but I didn't expect the massive bounty of herbs from the garden on this harvest day! I have been taking cuttings of herbs all summer long for my cooking as well as making lotions and potions for healing and comfort. I have also been taking larger cuttings to dry and replenish my culinary stock for colder weather. Today, however was a different kind of harvest.


As we prepare for the colder months ahead, the herbs will start to slow down and to retreat into senecence and or death. I will be mulching the herb bed in the next week or so to prepare for frosty mornings and eventually (eeek) snow. Before that happens, though I needed to take the large harvest of herbs for medicinal and craft purposes.


Lavender was one of my goals today...lavender is fantastic in that it provides two cuttings! First the florets are harvested, dried and either the flower pods are removed or they are left on the stem for crafting...that is what I am doing since I already harvested the culinary portion. The second cutting is the trimmings. To properly maintain lavender bushes, you need to prune them down to a mounded shape. All of those trimmings can be bundled up and dried and used for perfuming your fireplace, firepit or sacred fire this autumn and winter.


The same goes for lemon balm (which there is always a bumper crop). Trim your plants a handful at a time and bundle the trimmings with a rubber band out in the garden, it makes it soooo much easier, then hang these bundles somewhere light and warm to dry. I placed tension rods in my sunporch windows thanks to a suggestion of a friend and tied the bundles to it with kitchen string. Once dried, I will keep stored for gifts this winter!


The more delicate herbs of sage, thyme and the last of the basil are treated a little differently. These stems are picked clean of just the leaves (no stems), washed carefully and either dried on a flat drying rack (see earlier posts) or you can use an electric dehydrator (of which I am now in possesion of). Once dried, they can be packaged in airtight jars kept away from heat and light.


I have a few days before the mornings get too frosty and they herbs die back...I still have to cut back the mugwort, wormwood, bergamot and a few other medicinal herbs and get them dried for winter storage before the cold days are upon us!


Happy Gardening!

Friday, September 23, 2011

Between the Worlds: A Green Portrait

Last week I spent my vacation at a wonderful gathering called Between the Worlds. One of the many things this festival celebrates is our connection with the earth. And what better place than Wisteria to celebrate that interconnectedness of life!

Wisteria is situated on 620 private and rural acres in the Allegheny mountain plateau region of the Appalachian mountain chain. Swisher Coal Company and others strip mined and lumbered the area beginning around 1959. Reclamation work was done by the state of Ohio from the mid-1980's until the mid-1990's. The owners and residents of Wisteria have continued that work over the last 15 years. The spectacular place not only has some great camping, festival and sacred space, it is also a permanent nature reserve. This space was marvelous for connecting with people, but also an amazing place to meditate.

What struck me about this precious land isn't that it is perfect, clearly the damage inflicted upon it is still evident, but what is amazing is that the quiet majesty and determination of nature to heal itself is alive and clear everywhere on this land. While the land is not fully healed, it is on its way; you can feel the spirit of the land reawakening. Here you can listen to the voices of nature and add your own to the chorus. I won’t soon forget my experience there and in celebration of the Autumnal Equinox, Mabon or Balance day...here are a few images from a couple of my nature hikes to share.

Happy Gardening!

Wednesday, September 21, 2011

Walking Between the Worlds


Even a sustainability nut, earth god(ess) needs to recharge his batteries and sometimes he really needs to step out of the comfort and security of his home by the hedge and take on a challenge. Well that is what I did recently…and I am so much better for it.

My friends know that for years, I have resisted the idea of camping…I don’t want to upset anyone by saying this, but there are no concierges in the woods…which was a concern of mine, but I decided to push past my fear of that, of being in a tent, being dragged to the woods by a pack of rabid raccoons, catching the scurvy and the host of other fears that have kept me from experiencing nature more deeply. Those who really know me understand that I follow an eclectic path to spirituality, acknowledging a creator but understanding firmly that I walk in and work in this world.

The opportunity came to combine these dual natures in a single event. A camping experience as well as a spiritual retreat called Between the Worlds; a week long gathering of similar minds and souls for revelry, communion, learning and brotherhood.

It is terribly difficult for me to translate the experience into words other than it was transformative on a physical, emotional and even metaphysical level for me. I strengthened bonds with my current friends and made new ones I hope I will have for the rest of my life. I proved to myself that I could be self-sufficient, interact with others who are like minded and embrace aspects of myself I have long suppressed.

For my traditional Jewish nature, this type of event couldn’t come at a better time. As we approach the high holy days of Rosh Hashanah and Yom Kippur we analyze our life, our choices and our direction for the next year. My more earthy side also acknowledges the ending of one year and the beginning of the next with the Autumnal equinox and Samhain. With this convergence of annual events comes the reaffirmation of my commitment to nature, the land and earth based energy I work with. I am definitely refueled to work with my garden, produce yummy food and good medicine for myself and those I care about!

I am slowly re-entering the world but the memories of this week are passing through my mind and my heart and filling it with warm light and energy.

Blessed Be and Happy Gardening!

Monday, September 5, 2011

Feelings...who who who...feelings


Self help books, Oprah and my therapist are always talking about how good it is to express our feelings so I am going to do just that....but just for a minute ;-)


Today was the first major garden clean up day. The butternut and pattypan squash plants have come to the end of their lives. I pulled what squash were left to be harvested and then removed and composted the vines, thanking the plants for the wonderful yeild this year dispite the weird weather. I also harvested the last of the green beans and composted those vines as well. The peony plants were cut down to the ground since they were brown and wilted.


This time of year always stirs emotions for me...I am a bit melancholy since the biggest part of the growing season has come to an end and I know that fall and winter are not far behind. I am also extremely grateful for the garden and the wonderful and delicious things it brings. I am also resigned that much of the garden will be resting this year, but I am also hopeful that my new greenhouse kit will allow me to eek out some cold loving greens for the majority of the winter.


There are still many more things in the garden; tomatoes for a couple more weeks as well as eggplant. I am planting broccoli transplants this week since my seedlings were eaten by a garden visitor as well as all of the cold weather crops that are coming up; lettuce, radishes, carrots...so while this is a bit of an ending for the summer garden, it is a beautiful and quiet beginning of the fall garden.


I wish everyone a peaceful and safe Labor Day and Happy Gardening!

Saturday, September 3, 2011

Summer Harvest: Sweet Bell Peppers!


The peppers have started to mature! I am very excited since this is the first year of success with peppers in my garden. They have always been destroyed or pilfered by the fairies, brownies or what have you. This year I moved them to a large pot on the patio where they would get full sun and I could keep an eye on them!


Bell peppers have been cultivated to come in different colors including red, yellow, orange and green. I myself prefer the yellow, red and orange...they seem to have a more delicate flavor, more nutritional value and have fewer "digestive side effects", plus they are pretty :-). These peppers are native to Mexico, Central and South America. The peppers enjoy a lighter soil mix blended with good compost and peat when planted in pots. They are not heavy feeders, but a good organic fertilizer once or twice a season is fine. Do not let the soil dry out too much or the plant will be stressed and not produce peppers. Keep it moist but well drained.


I pulled my first orange pepper from the plants this evening and sliced it up and saute'd it with roasted tomatoes and served it tossed with linguini. The pepper and tomato mixture is also flavored with fresh garlic, basil and oregano as well as salt and pepper to taste. I love late summer meals that are easy to toss together, but still delicious!


Happy Gardening!

Monday, August 29, 2011

Planting Day!! Rewind the Clock!


No, it isn't time to set the clocks back quite yet, but it is a return to spring in the garden. When the oppressive heat of summer recedes here in Ohio in late August and the first part of September, it is time to plant...or I should say re-plant spring favorites. And that is just what I did yesterday.


I planted several pea plants and some longer season carrots a couple of weeks ago, but yesterday I removed one of the patty pan squash plants and that left nearly 8 square feet of planting space available for fall crops. A shorter season (57 day) carrot, french breakfast radishes and four square feet of a mix of spring and winter greens (spring mix mixed with chickory, red radichio).


This is also the part of the bed that I will be putting the new greenhouse attachement I purchased to try and grow some greens throughout the winter (more on that later). Even without protection, these plants should go until our first killing frost, then the radishes and carrots should come out before the ground freezes.


Enjoy your spring...oh, I mean your fall garden!


Happy Gardening!


Sunday, August 28, 2011

Summer Harvest: What to do with all those squashes?


I really like how prolific the patty pan squashes have been this year, they have produced delicate white squash, slightly yellow and also a more hard skinned yellow squash...at times the harvest has been nearly overwhelming, but I keep either dry storing the hard skinned squash and cutting up and freezing the thin skinned variety. Last night I was invited to a dinner party and needed to bring a side dish. I came up with Summer Squash and Leek Fritters! These are similar to the Latkes I make at Hannukah with potatoes and onions.

I had a few leeks that were ready to come out of the garden so I cleaned them thoroughly and sliced them thin, to the leeks I took three medium (5-6 inch diameter) patty pan squash, removed the seeds and grated them on a box grater. Next I added salt and pepper to taste as well as approximately 3/4 cup AP flour. I beat two eggs and added it to the mixture to bind, then heated about a half inch of oil in a skillet (a combination of grapeseed and olive oil). I dropped about two tablespoons of squash mix in once the oil was at temperature and flattened the mound. The fritters are fried until they are golden on one side and then flipped to do the same on the other. Drain on a paper towel or leftover paper bag.


I took these to the party and warmed them in the host's oven...they were definitely a hit and gone super quick!


Happy Gardening!

Thursday, August 25, 2011

Summer Harvest: Drying Herbs


I get really frustrated at the quality and price of dried herbs and spices in the grocery store or in particular a gourmet store. You definitely get what you pay for, but even at best, what you are getting is two to three years old by the time it hits the shelves of your store.


I canvased the industry for an average price of herbs...I checked my local grocery store, a specialty spice store and a New York gourmet emporium and on average your standard herbs average $4-$6 per ounce of dried herbs. Not to mention the origin of these herbs are usually overseas (Spain, Egypt, etc.)...not a very environmentally friendly purchase.


The good news is that my frustration for 99% of my herbs is over since I started growing my own in a large dedicated bed. On average each plant species cost me around $2 and each plant, depending on the variety produces 8-10 ounces of dried product throughout the season. That works out to around 25 cents per ounce. Plus I know that the product is only one season old and can be stored for 8 months to a year. I can also share some of these products with my friends so they can save $ too!


Drying herbs couldn't be easier. You can simply bundle the herbs and hang them upside down in a warm dry space. You can use an antique drying rack like I do, or you can use an electric dehydrator. I am considering purchasing one, but I need to get more information on the cost of ownership and operating before I decide to invest in one.


Another reason to start and maintain a garden, as you add flavor to your dishes, you can keep money in your pocket, have fresher product and keep from buying products that require a large amount of oil and gas to get to market!


Happy Gardening!

Saturday, August 20, 2011

Summer Harvest: Butternut Squash


So far I have been able to pull three large squashes from my two plants. A couple have been left on the vine since they were attacked by the evil squirels. They can continue to snack on those and hopefully they will leave the rest alone. I have three or four more that are maturing and still have several blossoms that show promise. Hopefully I will have a few more for the pantry and freezer.


Butternut squashes are a versitile fruit in the kitchen as it can be roasted, toasted, pureed for soup, mashed into soups, baked into casseroles, breads and muffins and adds a sweet earthiness to each dish it is added to. Add to its versitility, the fact that it packs a whollop of nutrition (fiber, vitamin C, manganese, magnesium, potassium, Vitamin A and finally Vitamin E).


The only downside I see to this marvelous fruit (aside from its squirel luring effects) is that they do take a bit of space to grow. I placed mine under an obelisk structure in the garden to curtail some of its outward expanse, but it still spread over my lilac bushes and across my garden walkway to encircle my compost bin. I am going to try a compact variety next year and see what that is all about, but for the moment, I am enjoying the bounty of this fruit by dry storing some of the harvest while peeling, dicing, blanching and freezing the rest for soups and baking!


Happy Gardening!


Sunday, August 14, 2011

Planting Day! Fall Crops


The full moon was last night, which means yesterday and today are optimal times for planting. In addition, the weather this morning was nice and not too hot! Perfect conditions for planting the first of the crops that should take me into winter.


This morning, I planted peas along with one of my obelisk structures, in addition I planted the first planting of lettuce (the weather should support two or more successive plantings). I also put down a small crop of carrots to begin, once the squash plants are removed, I will put down more. I also planted beets and radishes. It is almost like beginning at midsummer, the planting season goes into reverse with the crops you plant in the spring now being grown in the fall. Along with the broccoli and brussle sprouts I planted a couple of weeks ago, my fall garden is ready to go!


To prepare the soil, I simply tilled in the grass clippings I have been placing on the top of the garden as mulch to aerate the soil and provide nutrition. Planted according to package direction and watered the seeds in throroughly to ensure maximum seed to soil contact!


Happy Gardening!

Summer Harvest: Drying Tomatoes!


My patience is paying off...the heirloom tomatoes (which have matured at a snails pace) are finally bearing their ripe fruit to the tune of 1-3 beauties per day...some orange, some yellow, others striated red and still others a beautiful blush. I know in a week or so I will be over run and making sauce night and day to put up, but for now, I am using the tomatoes as they come. I have taken to eating a low acid Kellogg's Breakfast tomato for breakfast along with a boiled egg which is just yummy, having a nice salad every day with the lettuce from the garden as well as a nice ripe plum tomato!


I still have an overabundance of this nutritious and delicious crop, so I needed to preserve them. I could freeze whole tomatoes (and I do), but I love sun dried tomatoes in breads, pasta, etc. so I decided to make my own.


I do not have a sun powered dehydrator (even though I looked up plans to build one) and I have not saved enough points from my bankcard to get one for free from Bed Bath and Beyond (soon though!) so I am left with using my oven. I am blessed to have a convection oven which circulates air while things bake...it makes this task so much easier. To oven dry tomatoes, preheat the oven on the lowest temperature (175 degrees F). Wash and slice the tomatoes thin and place them on a cookie sheet lined with parchment paper or better still Silpat liners. Place the tomatoes in the oven and bake until completely dry (between 6-7 hours).


Once dried, allow to cool, then peel off the dried tomatoes and place in a jar. Cover the tomatoes with olive oil and keep in a cool dark place for up to six months or store in the refrigerator for up to a year. Let the tomatoes come close to room temperature (allow the oil to clear) before extracting the delectable treasures and enjoy in your favorite recipes!


Happy Gardening!

Sunday, August 7, 2011

The Summer Harvest Continues: Swiss Chard


Swiss chard is one of the most underappreciated of all vegetables. Most people really don't know what to do with it, plus I think the name is confusing not to mention the dark green leaves makes people think it is going to be bitter and nasty. But the virtues of Chard are many; it is easy to grow from seed, tolerates poor soil and lack of attention. It also tolerates frost and mild freezes. The taste of chard is delicious, like spinach, but smoother. This humble leaf is also nutritionally dense, carrying with it high amounts of Vitamin A, C and K as well as being rich in minerals, dietary fiber and protein!


I grew a yellow variety this year (it comes in a white ribbed or a rainbow of other colors) and yesterday I took a good amount out of the garden to make ravioli, it is my favorite way to save the delicious harvest for later since the ravioli can be frozen and eaten all winter long!


Swiss Chard and Cheese Ravioli


15 Ounces Whole Milk Ricotta

4 Ounces Shredded Parmesan Cheese

2 Cloves of Garlic (Minced)

1 Large Shallot (Minced)

4 Cups Washed and Chopped Swiss Chard Leaves (only...separate leaves from stems and large ribs)

1 Recipe Pasta Dough prepared for Ravioli (or use ready made wonton wrappers)

1 egg well beaten

1/2 teaspoon fresh basic minced (you can substitute dried)

1/2 teaspoon fresh oregano minced (you can substitute dried)


Combine the ricotta, parmesan cheese, garlic and herbs in a large bowl and set aside. In a straight sided skilled (with a lid) saute the minced shallot with a little olive oil until tender (2-3 minutes). Add the chopped chard, cover and cook until completely wilted. Use an immersion blender to further mince the chard/shallot combination. Remove from the heat and allow to cool completely.


Combine the chard mixture with the cheese mixture. Lay out pasta or wrappers on a parchment covered cookie sheet and add approximately a teaspoon of filling to each wonton (don't overfill).


You can brush with egg and fold the wonton over itself for a smaller ravioli or add a top wonton wrapper (press the edges to seal). Ravioli can be cooked in boiling salted water immediately and served with a bit of butter and salt and pepper or they can be frozen flat for a couple of hours until firm then transferred to plastic freezer bags for long term storage.


Happy Gardening!

Saturday, August 6, 2011

Field Trip: The Cleveland Botanical Gardens


I used to love field trips when I was a child. The Planetarium, Cranbrook Science Institutem The Detroit Institute of Arts. It was always marvelous to get out of the classroom and into the real world and learn new things about science, art and culture. I still love field trips...I try to take myself on a field trip or "artist date" once a month at least. It doesn't have to be a long trip, just somewhere I can be surrounded by the things I love and am inspired by; plants, trees, food, art, etc. My latest field trip was last weekend to the Cleveland Botanical Gardens!


Founded in 1930 as the Garden Center of Cleveland, the Botanical Garden has evolved into a treasure. Located on 10 acres on the campus of Case Western Reserve University, the gardens are also flanked by the Cleveland Museum of Art and the Natural History Museum. The CBG boasts 20 specialty gardens and two enormous biodomes featuring two distinct plant and animal habitats.


I specifically went to the gardens to look at the herb garden that was built and is maintained by the Western Reserve Herb Society. According to the Herb Society of America, this ranks as one of the top 10 herb gardens in the country. I love the use of space, the aesthetic..just everything about it. Please visit the CBG website for more information about planning your visit at http://www.cbgarden.org and please enjoy this sampling of pictures I have posted....jinkies...I hope to one day figure out flickr so I can post an actual photo album :-)


Happy Gardening

Sunday, July 31, 2011

Haricots Vert Si Vous Plait!


I adore green beans! I am particularly fond of the french fillet bean the Haricots Vert. This thinner and more delicate bean variety lends itself well to simple preparation and excellent taste. This is the first year I have grown this variety, some of you will recalll that I tried out a trellising variety (normally the French fillet are bush beans). The vines are not quite as hearty as their more generic cousins, but once established, they really produced! I have gathered quite a few beans already...some to enjoy (as in the recipe below) and some to blanch and freeze so that even in the depths of winter I can have the invincible summer...I mean invincible Haricot Vert!


Hericots Vert Lyonnaise


Ingredients


16 Cups of water

1 tablespoon of sea salt

1 1/2 pounds fresh green beans, rinsed and trimmed

3 tablespoons unsalted butter

1 clove garlic crushed

1 large red onion, slived in rings

1 pinch dried thyme

2 tablespoons red wine vinegar

freshly ground black pepper(to taste)

freshly ground nutmeg (to taste)

1 tablespoon finely minced parsley


In a large pot, bring slated water to a boil. Carefully drop by handfuls, green beans into boiling water. Return water to a boil for 5 minutes. Immediately drain and shock the beans in ice water for 5 minutes. Drain and wrap in a clean cloth; set aside.


In the same pot, heat the butter and lightly brown the garlic. Remove from heat and set aside for 20 minutes.


Remove the garlic from the butter and discard it. To the butter add onions and thyme. Cover the pot and braise the onions over medium heat for 5 minutes or until soft and transparent. Increase the heat to medium high and remove the cover to caramelize the onion.


Stir in the green beans. After 1-2 minutes, deglaze the pot with the vinegar. Season to taste with salt pepper and nutmeg. Sprinkle the parsley over the beans and serve.


Happy Gardening!


Wednesday, July 27, 2011

Cue the Angelic Choir! The Tomatoes have arrived!


GLLLLLLLLOOOOOOOORRRRRRRIIIIIIIOOOOOOOOUUUUUS! Well that is the only angelic line I know...from Angels in America...but I heralded the arrival of the first tomatoes of the season last night. Four tomatoes came from my heirloom plants. One, an Amish Paste tomato, a plum style variety that makes excellent sauce. and the others I picked were Orange Russian, an orange, lower acid tomato. The other two plants (German Pink and Brandywine) have not ripened yet, but will any day now. I am very pleased with the production of these varieties and will definitely try them again in next year's garden if their yeild is sufficient!


To celebrate, I am having a traditional french baguette for lunch with Camembert Cheese and one of the tomatoes sliced up!!!


Happy Gardening!

Tuesday, July 26, 2011

Whomp Whomp Whomp


I came out to the garden last night to find both of my summer squash plants almost dead...I think the eradic weather (hail last month, record heat and horrific thunderstorms this month) may have had something to do with weakening them as well as the opportunistic sunflower that grew right between them. I had to pull them both out as well as the sunflower. The sunflower will supply some black oil seeds for the birds for the next day or so...it isn't a total loss.


I went to the nursery today and bought (on a good sale) some Italian Cocozelle zucchini seeds which are fast maturing (45-50 days). With a warm fall, I should be able to eek out a few to freeze for the winter. I am unhappy about the plants not lasting until the end of the season, but I did manage to get quite a few squash off the plant over the last few weeks so I can't be too displeased.


Happy Gardening!

Monday, July 25, 2011

Using Herbs: Herbed Jelly


I am waiting patiently for the glut of summer harvest to start. The cucumbers are coming along although I am not sure about this variety...they don't seem to be doing as well as I had hoped. The squash plants have essentially taken over the garden and are producing, but the tomatoes, eggplants and peppers are still a week or so away. What is coming in strong are the herbs....the herb garden I planted in the spring is going like gang busters and I couldn't be more pleased.


One of the ways that I use herbs and also preserve them for later use is to make herbed jelly. Many people have experienced the nasty green mint jelly that was paired with lamb...not that mint jelly is bad, it just needs additional flavors to make it less harsh. One of my favorite jelly recipes is for rosemary jelly...this versative condiment works well with roasted meats and vegetables. This year I added another flavor to the jelly with garlic. I thought the two flavors together would bring out the best in my roasted food.


3-4 lbs of tart apples (granny smith)

4 cups water

5 cups sugar

1 large handful of rosemary leaves (removed from the stems)

6 large cloves of garlic.


Cut the apples in halve (do not peel) and place in a large non reactive pot. add the water and cook until the apples are very very soft (35-40 minutes). Mash the apples into a pulp. Strain the mixture through a jelly bag or fine cheesecloth for 6-8 hours to remove as much liquid as possible.


Rinse out the pot and return the juice to the pot. Add the sugar, rosemary and garlic and stir over a medium high flame until the mixture reaches jelly stage (I use my grandmother's candy thermometer for this...I think it might be the oldest one in existence).


Remove the pot from the heat and allow to cool for 10 minutes. Check for jelly setting by placing a spoonful of the mixture on a chilled plate (the jelly should set up quickly). Ladle into sterilized warm jars and cover with a lid until the jelly cools and sets.


Remove the lids and add either a disk of waxe paper or melted beeswax over the top of the jars and replace the lid. This jelly will keep 6-8 months. Refrigerate after opening.


Happy Gardening!

Saturday, July 23, 2011

Using Herbs: Healing Salves

There are so many uses for herbs; culinary, medicinal and cosmetic. Another product I like to make for myself and to give as gifts are healing salves. Herbal salves have a cosmetic effect on the skin by softening it and perfuming it with the essence of the herbs used and essential oil. Salve also heals minor bumps, bruises and scrapes. For those of us who work in the garden, kitchen and around the house, these salves save our hands so we don't look like we have been mining with our bare hands!

Salves are not difficult to make, they simply take a little patience and the herbal knowledge to know what herbs to use in your potion.

This morning, I wanted to make salve for myself, a friend and to put in a basket being auctioned off for charity, so I gathered self heal, lemon verbena and lavender plants. I cleaned the herbs and placed them in a double boiler over simmering water. To that I added two cups of an oil combination (grapeseed and extra virgin olive oil) and allowed the herbs to infuse the oil for 45 minutes to an hour. You can use a slower method to infuse by packing the herbs in a jar, adding the oil, sealing and leaving in the sun for a week.

While the oil was infusing, I grated a small block of beeswax into shavings and collected 8 tablespoons. Once the oil was finished infusing, I strained the herbs from the oil (and put the herbs in the kitchen composter) and put the oil back in the pan, added the wax and 20 drops of lavender essential oil for fragrance and to add a little more healing power to the salve.

Once the mixture was complete, I poured the potion into prepared tins that I purchased on sale from a container supply store. These tins will be allowed to cool for at least two hours before covering and being allowed to cure.

This is a very economical way to provide yourself with skin soothing products and great gifts for your friends. Per tin, between the oil, wax, essential oil, herbs and tin the investment is around $1.50. I checked online and for organic gardener's salve (in smaller tins mind you) the price ranged anywhere from $10-$17. I will make more of these as the harvest continues to provide myself with a supply and for gifts for the winter holidays, birthdays, host gifts, etc.

There are so many reasons to have a garden, particularly an herb garden, this is just one more fantastic one for the list!

Happy Gardening!

Friday, July 22, 2011

The Summer Harvest: Cucumbers


The cucumbers have started to mature and ripen and I collecting one or more every day now. I think (and hope) that that yield will increase as the next few weeks pass. I grew a new variety this year and I am uncertain I will grow them again.


These are an English Chelsea pride cucumber. English cucumbers are the longer, sometimes thinner cucumbers you see in the grocery store wrapped in plastic and they are usually quite a bit more expensive than standard cucumbers.

Perhaps it is my lack of familiarity with this variety and their preferred growing habits, but the plants are not vining up the trellises like I had hoped, instead they are bunching in vines…this leads to cucumbers that bend and twist as they grow, not what I was hoping for…the flavor on the other hand is marvelous so perhaps I can adjust they way I grow them next year…that I will decide on later.

Last night I determined I had enough cucumbers to eat for a few days so I decided to use the extra and make freezer pickles. I could have canned some, but these are equally good on burgers and as relish (sweet) if they are frozen and keep for more than 6 months which will get me to February of next year with cucumbers from this year’s harvest. I may can a few jars up for friends and to extend until next summer, but for the most part, the cucumbers will be eaten fresh or made into these crisp, delicious chips!

Freezer Pickles

2-3 cucumbers sliced medium to thick on a mandolin (I like my Japanese Benriner for this job)
2 shallots or 1 small onion (also sliced on the mandolin)
2 teaspoons kosher or sea salt
½ cup cider vinegar
1/8 cup granulated sugar
Pinch of ground turmeric
Pinch of celery, dill or mustard seed (or a combination)

Slice the onion/shallot and cucumbers into a large bowl and sprinkle with salt and mix. Cover the bowl and allow to sit at room temperature for 2 hours to draw out water. Drain and rinse the cucumber onion mix and rinse in a colander or sieve. Rinse and dry the bowl.

Return the mix to the bowl. Add the vinegar, sugar and spices and mix to ensure that the sugar has dissolved. Cover the bowl and allow to sit in the refrigerator overnight.

Transfer the pickles to smaller containers (serving size or slightly larger) and freeze. Allow to thaw to room temperature before serving and use within a week of thawing.

Happy Gardening!

Monday, July 18, 2011

Using Herbs: Soapmaking


Part of growing herbs is using them, earlier I posted some of the medicinal uses of herbs; but today I am going to talk about using them in cosmetics, specifically soaps. Everyone uses soap (or at least they should…you know who you are), but most people buy these chemically scented harsh soaps that do more damage to skin that care for it. I prefer a more gentle and natural approach.

Yesterday I made two small batches of soap from herbs from the garden. I started with an all-natural goat’s milk soap base…I hope one day to learn how to make it, but for now, I purchase it from Soap Molds and More http://www.soapmoldsnmore.com/store/WsDefault.asp?One=673

Goat’s milk is nourishing and soothing to the skin and makes a wonderful base for soap. Once I have my base, I add magic from the garden.

As I said, I made two varieties of soap yesterday. The first with Irish Steel Cut oats combined with dried spearmint from the garden ground to a medium fine consistency. This combined with the soap base to make a soothing green refreshing and nourishing blend!


The second variety is what I call “Three C” soap. It contains Calendula, Chamomile and Comfrey. Calendula is known for its skill healing and soothing properties. Chamomile is relaxing and comforting and comfrey is a skin healing herb. Both soaps are marvelous for every day use but for those who have dry, sensitive or irritated skin, these soaps can provide much needed relief!

I made about two pounds of each variety, poured them into my molds and let them cool. Once cooled and released from the molds, I “wash” the soaps in heavily salted water which allows the outside of the soap to cure and makes the bars last longer.

These beauties will be stored for my own use as well as be made into gifts for friends and family!

Making your own soap is just one way to use the bounty of nature that we cultivate in our gardens.

Happy Gardening!

Sunday, July 17, 2011

Patty Cake, Patty Cake...um..ooops Pattypan!


Patty Pan squash is a summer squash, notable for its small size, round and shallow shape and scalloped edges, somewhat resembling a flying saucer. While some might be tempted to toss them around like a frisbee, they are best for eating!. The name Pattypan derives from" a pan for baking a patty", in French, it is Patisson which is a Provencal regional name for cake.


I am growing a seed variety that is supposed to produce yellow, green and white although all I have seen thusfar is the white.


I decided to make squash soup with these beauties that I picked this morning along with some summer squash I picked the other day. I am going to can it for use later as well as give as gifts. I left the squash on the vine a little too long so it is too big to cook whole as the squash is most tender when it is relatively immature.


The pattypan squash is a powerhouse of nutrition in a little package; rich in magnesium, niacin and vitamins A and C. And it is light on the diet with a cup of squash containing only 20-30 calories with NO fat!!!


Happy Gardening!

Wednesday, July 13, 2011

Discovering the Genius of Thomas Jefferson (Part 5): Homesteading


It is a novel concept in this day in age with city life, modern conveniences and 24X 7 available services but in the 17th and 18th and even into the 19th and 20th centuries there have always been people who live off the land. Sometimes by necessity (particularly in earlier days when there were no grocery stores, gas stations or any sort of services), others by choice who learned to sustain themselves in an ecologically respectful way that emphasized self-reliance, low waste and ingenuity.

Homesteading has experienced a renaissance over the last 20 years and in particular the last 10. With skyrocketing costs, corporate greed, dwindling natural resources and appalling food quality people have turned back to basics to produce their own food and supplies free from chemicals, with low carbon and petroleum footprints and also the manage and maintain their home and life with a do it yourself lifestyle.

This is something I have been extremely interested in for some time (although to do this with a modern and stylish twist of course). Once again I am drawn to the lessons I learned at Monticello.

The gardens of course are first in my mind. Both the garden plane as well as the enslaved people’s gardens provided all of the produce consumed by the residents of the mountain. The fruit orchards provided fresh fruit, fruit for preserving and consuming and the vineyards provided both grapes for fresh consumption as well as the raw materials for much of the wine consumed at Monticello. Before it was fashionable to have microbreweries and home brew, even before commercially available beer, the people at Monticello created their own.

Preserving food was also of primary importance at Monticello to sustain the population over the long winter months. Meat and game were preserved primarily by smoking in a smoke house built beneath one of the promenades of the house. Grain cellars also stored wheat and other grains for use. The ice house, a particularly interesting invention was packed with ice from the river below the mountain as well as snow, packed hard and surrounded with straw to insulate. Ice was then used to keep food refrigerated and the run off was used in making beverages as well as drinking as there was a lack of water on the mountain.

Let’s be clear, the kind of homesteading at Monticello is on a grand scale, but the value is in the creative ideas and the ability to adapt the principles to a more modest home like yours and mine. It is also perfectly acceptable to use modern conveniences to help along the way as long as they are used with moderation and respect for their immediate and far reaching costs.

I could go on and on about the lessons learned at the magnificent place about sustainability, homesteading and returning to a gentler and self-sufficient way of life, but this is a blog and I will post my experience as I go along this path!

Happy Gardening!